The Web Uploader lets you upload your imaging studies without the need to run Java.
1) Click 'Upload Studies' from the case portal (in the Studies tab)

2) When the Upload Studies dialog opens, click the 'Web Uploader' button (if the uploader does not open, please refresh the page and try again)
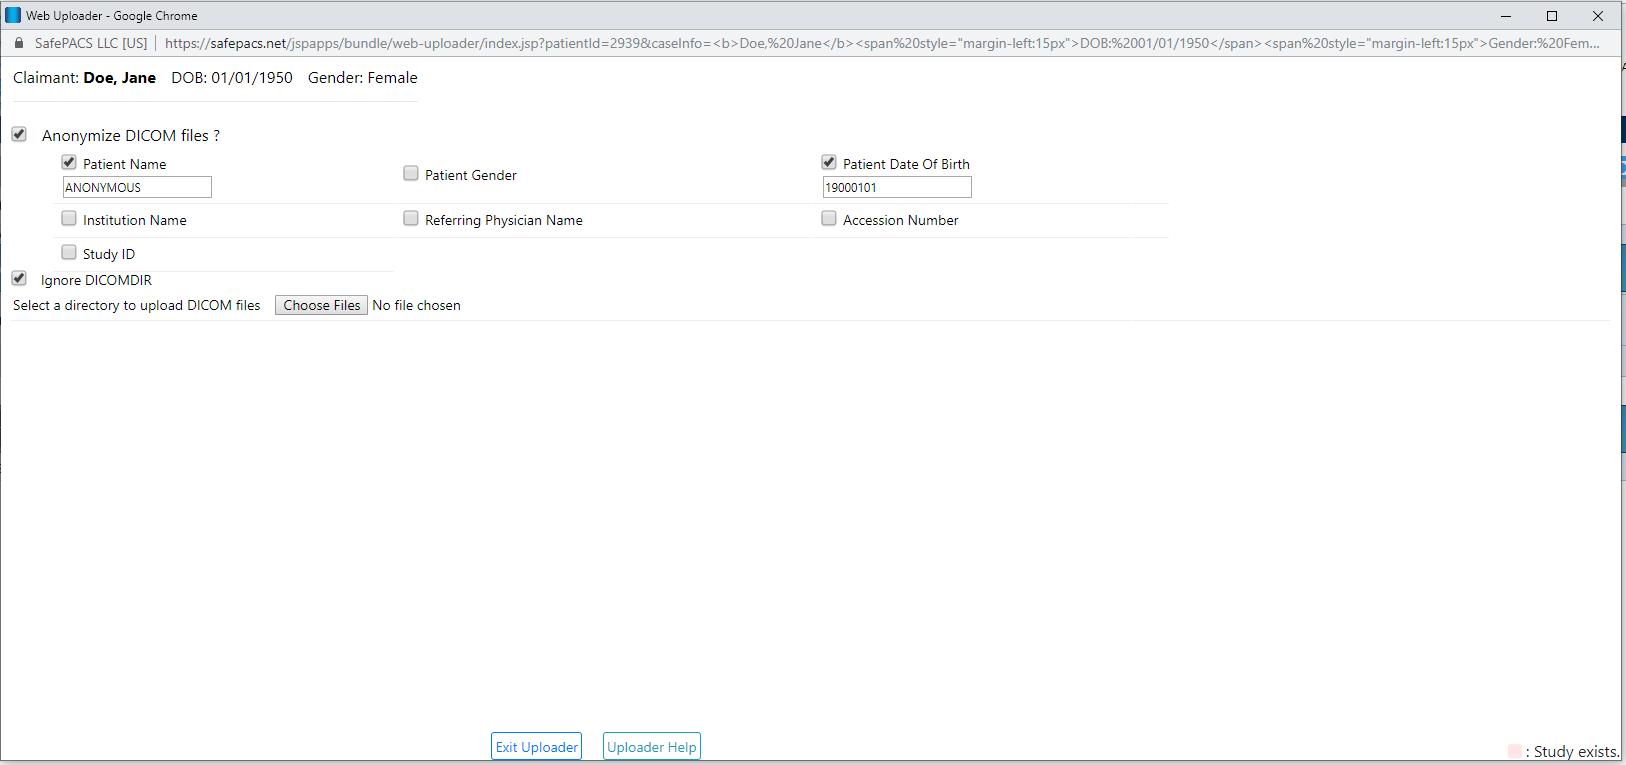
3) A Web Uploader dialog window will open, as shown below.
a) If you want to make the studies you are uploading anonymous, check the 'Anonymize DICOM Files ?' checkbox. This will drop down several fields about the claimant/study that you can make anonymous, thereby hiding claimant information from anyone who views the study (or studies). For each item you select, you can enter a value you want to insert for that field, or leave the default value. See the image below. Please note that the Case Caption for this case will still show in the viewer.
b) We recommend leaving 'Ignore DICOMDIR' checked
4) Click the 'Choose Files' button. This will open a typical Windows dialog that will let you choose the location (drive or folder) where your studies are located. For example, in the image below, you would click 'DVD RW Drive (H:)' if you were uploading from a CD located in the H: drive. If the files were located in a folder on your hard drive (typically the C: drive), you would click 'Windows (C:)' and then continue clicking folders until you have found the correct folder where your study (or studies) is located. Please do not select just the C: drive - that will cause the uploader to search your entire hard drive!
5) Once you have clicked on the folder, or CD drive, where your studies are located, click the 'Upload' button, and a confirmation dialog, shown below, will appear

6) Click the 'Upload' button. The uploader will then search for studies to upload and present an upload table, as shown below.

7) You can now select studies to upload by using the checkboxes next to the studies and then clicking the 'Upload All'/'Upload Selected' button to the right above the table (the button text changes depending on whether you select all or some of the studies). Alternatively, you can upload individual studies by clicking the 'Upload' button to the right of the study you want to upload.
If a study row has a pink background color, then that study already exists in the SafePACS portal for this case. Uploading the study again will overwrite the same, previously uploaded study, but will not affect any expert assignments you had previously made for that study.
8) You can use the 'Pause' and 'Cancel' buttons to either pause or cancel an upload. A 'Pending' button indicates that a study is waiting to be uploaded.


